
Introduction to Bug/Defect Life Cycle In Software Testing
A Bug/Defect life cycle in software testing is a process in which a reported defect passes through multiple stages. It starts as soon as a defect or bug is found and closes when the tester is assured that it is fixed and not impacting any other functionality or areas of the software.
There are two major persons required in any Software Development process-
- Software Developer – One who designs and implements the code.
- Software Tester – One who tests the software, detects as many defects as possible in the system, and reports them.
Benefits of Defect/Bug Life Cycle in Software Testing
The Defect/Bug Life Cycle is essential for testing teams to understand and apply, as it helps them build high-quality products, uphold user trust, and launch on time. Let’s take a deeper look at its advantages:
Impact on Product Quality
When defects are identified, documented, and resolved through a structured process, it promotes thorough verification and reduces the likelihood of lingering issues. Furthermore, the defect life cycle in software testing ensures every issue, from minor to critical, is systematically addressed.
Business Repercussions
According to a report, the last-stage bug discovery often leads to 30% longer project timelines and increases budget overruns. Therefore, undetected defects or bugs can halt business operations, cause costly outages, and spark negative publicity. Hence, a clear and well-communicated Bug or Defect Life Cycle allows teams to prioritize critical fixes through which business functions are not compromised.
Agile, DevOps, and Shift-Left Integration
The Defect/Bug Life Cycle strategically develops a shared language and workflow for tracking and fixing defects that do not fit naturally into these iterative environments. Teams can detect issues earlier by integrating bug tracking with CI/CD pipelines and automated testing. Moreover, the shift-left approach ensures defects are found, triaged, assigned, and resolved swiftly before bugs snowball and disrupt the entire sprint or releases.
Team Collaboration
With the Defect/Bug Life Cycle, teams will not have to face confusion over status or responsibility. Each bug carries a clear “state” and owner. Moreover, with transparent communication, teams can prevent misunderstanding, which helps in aligning priorities. Therefore, with time, the Bug or Defect Life Cycle promotes a culture where knowledge is shared routinely. Leading to fewer or no missed details, smarter handovers, and stronger accountability.
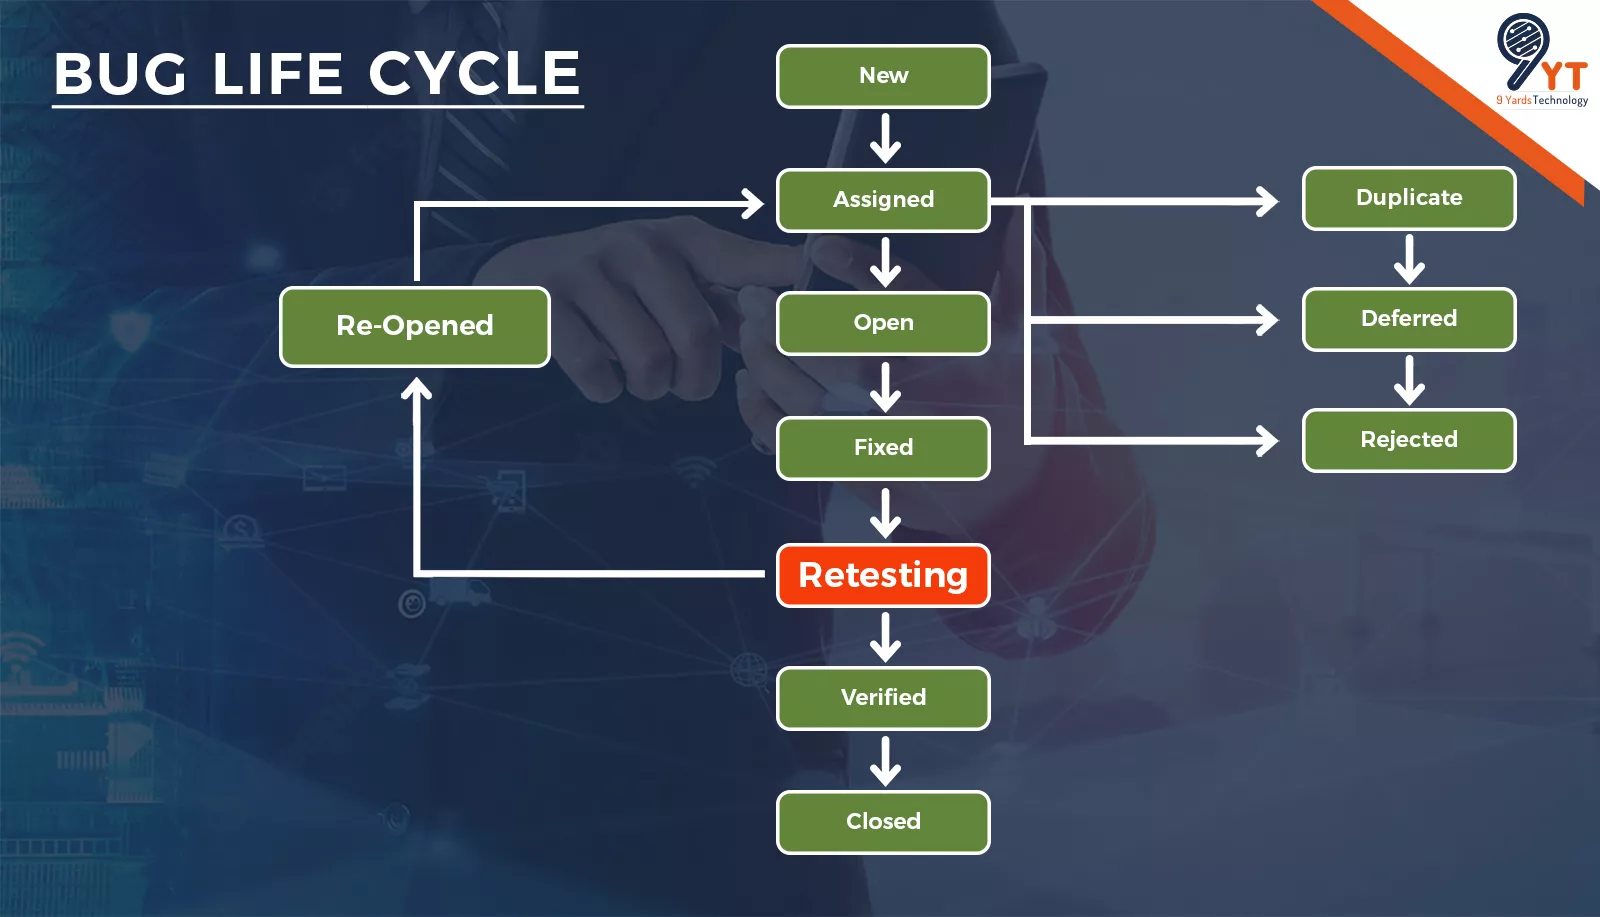
Example of Bug/Defect Life Cycle In Software Testing
Suppose a QA tester is checking the “Login Page” of a website and finds that users can “log in” even with the correct credentials. Therefore, the tester reports the issue, which begins the Bug/Defect Life Cycle. With this, the defect now enters the ‘New‘ state.
The test lead reviews the defect and ‘Assigns‘ the bug to a backend developer. Hence, after checking the code, the developer agrees it’s a valid issue, so the status changes to ‘Open‘.
Further, the developer identifies the root cause, fixes the bug, and then updates the status to ‘Fixed‘.
Therefore, the defect now returns to the QA team. They ‘Retest‘ the Login flow.
- If the bug still exists, QA marks it as ‘Responded‘ and sends it back to the developer.
- If the defect is fixed and it works, QA marks it ‘Verified‘.
Hence, when all the related tests pass, and no new issues appear, then the QA team ‘Closes‘ the defect.
In the Defect/Bug Life Cycle, bugs may get special statuses:
- Deferred (will be fixed later)
- Rejected (not a valid issue)
- Duplicate (already reported)
This life cycle ensures that every bug moves through a trackable, clean workflow, from discovery to closure, which helps teams maintain accountability and quality.
Defect States
When a defect is reported, it has to go through different states as mentioned below:
1. New
It is the very first state of the Defect Life Cycle. It occurs when a new defect is found and reported. In this, the tester makes a proper document by mentioning how to reproduce the defect.
2. Assigned
In this state, the bug is assigned to a particular developer who takes full responsibility for fixing the defect.
3. Open
When the developer starts working on the defect, its state change from assigned to open. The developer will go through the details of the tester’s information and will check if this is a valid defect or not. In this state, the defect can be moved to Duplicate, Deferred, or Rejected, based on analysis.
4. Fixed
When a defect is valid, the developer starts working on it. Once the developer fixes it by implementing the code changes and validates it on his end, the defect moves to the fixed state.
5. Pending Retest
Once the developer fixes the defect, he provides the latest code to the tester to retest the defect. The tester re-validates the defect and changes the defect status according to the results. It is changed to the ‘Pending Retest’ state when it is pending from the tester’s end.
6. Retest
It is the tester’s responsibility to retest the defect. If it is fixed, the tester closes the defect with proper evidence. If it is not fixed, the tester changes it to the re-open state. Once the defect is fixed, it moves to pending retest.
7. Re-Opened
Once a bug comes for a retest, the tester retests it. If the defect is still not fixed after the developer’s fix, the tester re-opens the defect and assigns it back to the developer for the fix. In this case, the defects must go through the whole life cycle again.
8. Deferred
The bug can be marked as deferred also. When a bug is marked as deferred, it means that it will be fixed in the next release. There might be many reasons to mark the defect as ‘Deferred’. It can be a low priority or a defect not affecting the software or functionality.
9. Duplicate
A defect can be marked as a duplicate if some other tester already reports the same defect. So, checking the reported defects before reporting any new defect is always advised to avoid duplicity.
10. Closed
When a defect comes for the retest, the tester retests the defect, and when he is confident that the defect is fixed properly, he marks the defect as close. It means the defect is retested, approved and closed, and it is not reproduced again.
11. Rejected
When the developer thinks the defect is not genuine, he marks the defect as rejected.
In addition, let’s discuss all the details required while reporting a defect.
Defect Data contains multiple details like –
- Problem Summary: It contains the summary of the defect.
- Defect Details: Defect Details include a detailed version of the defect.
- Steps to Reproduce: It includes all the details to reproduce the defect.
- Frequency of Defect: The frequency of a defect suggests whether it is an Always Defect, Sometimes Defect, or Once Defect.
- Test Version: It conveys on which version the defect is found: Software or Build.
- Type of Defect: It includes the defect type, for example, if the defect is a functionality defect or UI defect.
- Severity: Defect severity means how severe the defect is. It is basically from an application point of view.
- Priority: Defect Priority means which defect should resolve first. It is basically from a user’s point of view.
- Name of the Tester: Name of the tester who reported the defect.
- Assignee: Developer who will resolve the defect.
- Resolution Version: In this software version, the defect gets fixed.
- Defect ID: A defect ID is assigned to the defect for future reference.
What Things Need to Keep in Mind While Implementing Defect Life Cycle
- Every team member should know about the defect life cycle and all the states in which the defect can be present.
- The defect should be properly documented. All steps to reproduce and details regarding the defect should be mentioned while reporting it.
- While changing the defect state, the person should be properly aware of what and why he is doing this and know properly about it. And a proper reason and evidence should be attached to the defect while updating the status of the defect.
- The defect tracking tool should be up to date.
Conclusion
The defect life cycle helps in finding the defect at different stages. It also helps the developers to fix the defect based on its severity and priority. You can easily track all the deferred defects by using this cycle, which leaves very few chances of missing a defect.
By following the defect life cycle, Developers and Testers can be on the same page regarding the status of defects. There is no need to ask for defects individually because it can be used to track all the defects and their status. The defect life cycle also allows the documentation of all the defects properly and ensures that the software or product is defect/bug-free.

0 Comments
Anamika Rawat
October 05, 2022, at 9:57 amThe explanation of each defect state is very clear. Beginners will find it easy to understand how a bug moves through different stages in the testing cycle.
Diya
November 16, 2022, at 11:03 amThis article simplifies the defect life cycle really well. A small diagram showing the transitions between states would make it even more visual and engaging.
Lokesh Shrama
January 09, 2023, at 8:06 amThe article explains the defect life cycle in a very clear and structured way. Each stage—from New to Closed—is described in simple terms that beginners can quickly grasp. Adding a real defect flow example would make it even stronger for practical understanding.